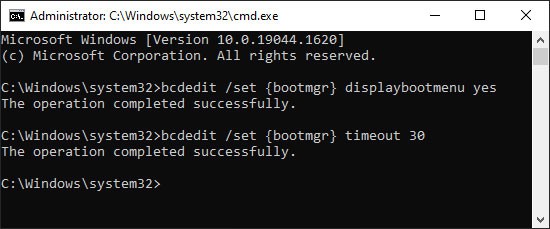
Of course, in single-OS systems, it’s usually better to disable Windows Boot Manager. Unless you’ve made multiple boot entries from a single OS, all it does is make the boot process longer for no reason. In any case, we’ve listed all the necessary steps to enable or disable Windows Boot Manager via both GUI and Command-Line in the guide below.
Enable or Disable Boot Manager via GUI
As usual, the GUI method is very convenient but doesn’t allow for much flexibility. It’s very easy to enable or disable the Windows Boot Manager, but there’s not much room for further modification. Regardless, here are the necessary steps:
Enable or Disable Boot Manager via Command Line
The CLI method is somewhat technical but allows for lots more ways to modify the Windows Boot Manager. You’ll use the bcdedit command to enable/disable Bootmgr. Keep in mind that you may need to turn off Secure Boot or BitLocker for bcdedit to function properly. With that said, here are the necessary steps:
How to Modify Boot Manager
Modifying bootmgr not only includes enabling and disabling it, but also adding or removing an entry, editing the display order, changing the default entry, and much more.
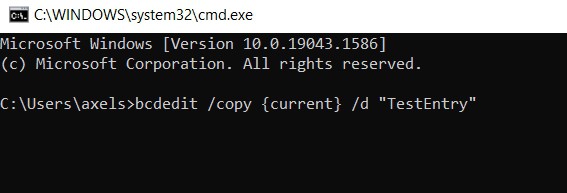
Add New Boot Entry to Bootmgr
You can create multiple new boot entries for an operating system and customize each to have a different set of configurations. The easiest way to do so is to copy an existing boot entry and then modify it. Here’s how you can do that: Here, the value inside the curly brackets is the new entry’s GUID. You can use this ID to modify this boot entry however you wish.
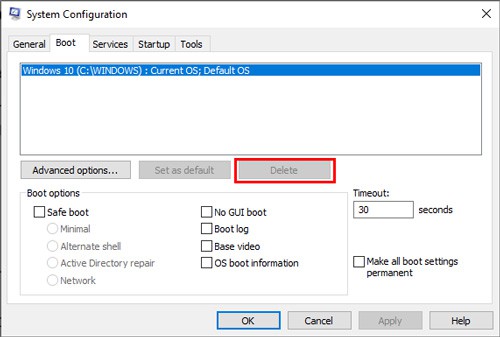
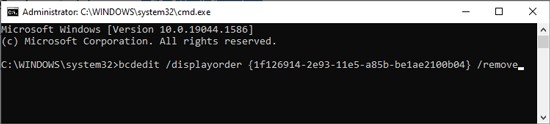
Remove or Delete Boot Entry
Removing a boot loader entry removes it from the boot menu, but it will still be present in the BCD store. You’ll need to delete it instead to remove it entirely. Here are the steps to do so via GUI: With the command line, you can choose to remove it or delete it as you prefer. You can do either using the steps listed below:
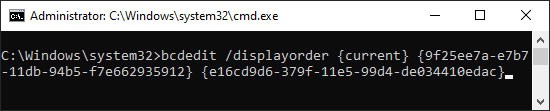
Edit Display Order on a Multi-Boot Menu
You can set the display order of boot entries on a multi-boot menu using the /displayorder switch. E.g. if you use the following command: bcdedit /displayorder {current} {9f25ee7a-e7b7-11db-94b5-f7e662935912} {e16cd9d6-379f-11e5-99d4-de034410edac} This sets the display order as:
current 9f25ee7a-e7b7-11db-94b5-f7e662935912 e16cd9d6-379f-11e5-99d4-de034410edac
Alternatively, you can also use the /addfirst and /addlast modifiers to directly add an entry as the first or last items respectively on the Boot Manager menu. E.g.bcdedit /displayorder {5370b175-2e93-11e5-a85b-be1ae2100b04 } /addfirst
Change Default OS in Windows Boot Manager
You can easily change the default OS in Windows Boot Manager via System Configuration. Here are the steps to do so: You can also specify the default boot entry by using the bcdedit /default {ID} command in Elevated Command Prompt. Don’t forget to replace ID with the appropriate value of the boot entry though.
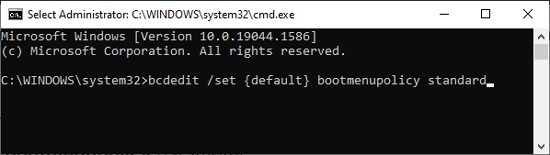
How to Get Windows 7 or Windows 10 Style Dual Boot Screen?
Here are the steps to get the dual boot screen you want using the bootmenupolicy parameter: