However, there are a few other reasons causing the startup error. So, let’s check the common causes, along with a few solutions to this issue discussed below.
Fixes For “Startup Repair couldn’t repair your PC”
Before you get this error, the blue screen windows will say “Automatic Repair: You PC did not start correctly”. First, try to restart your computer. A simple restart can solve the issue. After the restart, if the OS doesn’t fix the issue, you will get a different screen. The windows will display the Startup repair error. The restart option will not be available now. Here are a few Advanced Options settings you can try to fix this issue.
Startup Repair Tool
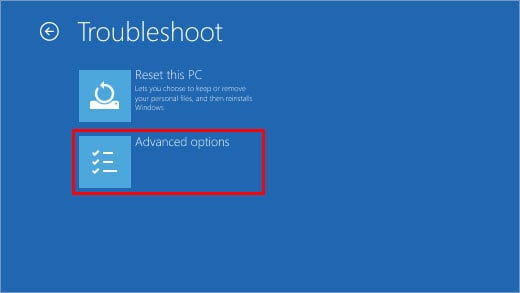
The Startup Repair Tool will diagnose your PC for any disks error and try to fix them. This usually takes a lot of time depending on the computer you use. To use the Startup Repair Tool, click on the Advanced Option > Troubleshoot > Startup Repair. If the computer has multiple user accounts, there will be an option to choose which user account you want to fix. If the computer still displays the same error, continue with other fixes.
Use the Safe Mode
In safe mode, most of your device and driver won’t be running except for some basic drivers like display drivers, and mouse drivers. These device functions are disabled so that we know the basic drivers are performing properly. To start your computer in safe mode, you can follow these steps.
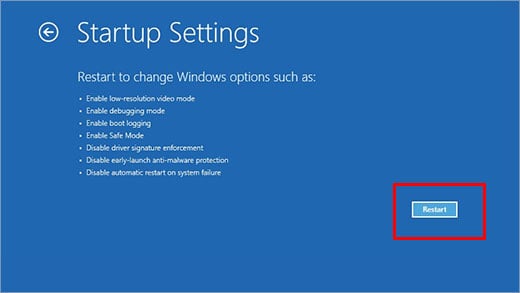
Click on Troubleshooter on Advanced Options.Select Advanced Option, then Startup Settings.Click on Restart.When your computer restarts, you will see multiple options for safe mode. Press F5 to start safe mode with the internet.
Run the System File Checker (SFC)
The SFC is a windows utility tool that you can use to find and fix corrupted files in your windows. To run the system file checker, you can follow these steps:
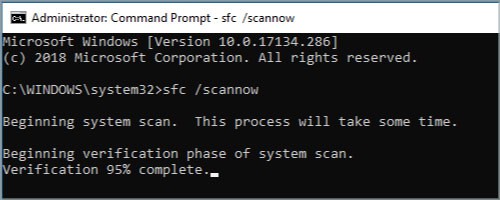
Press the Windows + R key.Type cmd and press Shift+Ctrl+Enter to run the command as an administrator.Type sfc /scannow and press the enter key.
Wait for a few minutes for the SFC to complete. Restart your computer to get out of safe mode and check if the startup error is fixed. If you cannot get out of safe mode, you can follow these steps:
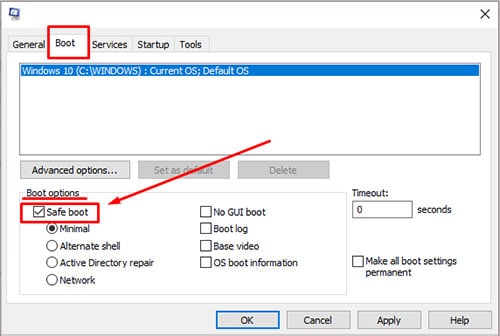
Press Ctrl+Shift+Esc to enter task manager.Click on Files, then Run new task.Type “msconfig” and click ok.Click on Boot, Remove the check mark from the safeboot checkbox.
Run the Check Disk Command
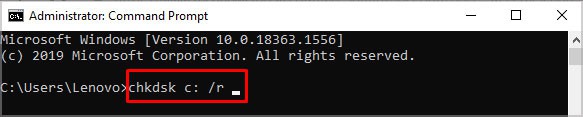
The Check Disk command in your computer checks a disk for errors. It shows errors on your disk as a status report. To run check disk, click on the Advanced Option > Troubleshoot > Advanced Options > Command Prompt. Now, type chkdsk c: /r and press enter to repair errors and check of bad sectors.
Fix your Boot Configuration Data
Boot Configuration Data (BCD) is a file that includes boot configuration parameters that tell Windows how to start. A faulty BCD file causes unbootable Windows. To repair your Boot Configuration Data, click on the Advanced Option > Troubleshoot > Advanced Options > Command Prompt.
Type bootrec /rebuildbcd, then press Enter. Wait for the process to completeType bootrec /fixmbr and press EnterAfter completion, type bootrec /fixboot, then press Enter.
Restart your computer to check if the problem is fixed.
Disable Early Launch Anti-Malware Protection
Installing an anti-malware program can cause this issue. You can disable these types of programs by following these steps. To start your computer in safe mode, you can follow these steps.
Click on Troubleshooter on Advanced Menu.Select Advanced Option, then Startup Settings.Click on Restart.When your computer restarts, you will see multiple options from 1 to 9. Press 8 or F8 to select Disable Early Launch Anti-Malware Protection.
Check Memory Module
If your RAM sticks are not performing correctly, you may get the error. The OS constantly needs memory to do its tasks. If you have a faulty memory module, the OS cannot do said task. Here are a few things you can do to fix your memory module.
You can remove the RAM sticks and set them in a different RAM slot.Try turning the computer using a single RAM Stick at a time to determine which one is faulty.Clean the RAM sticks with rubbing alcohol and a cotton swab. And clean the RAM slots with pressurized air.
Disable Automatic Startup Repair
Automatic Startup Repair starts by default if you have some issues when the system boots. If you do not want the Automatic Startup Repair to run, you can simply disable it by following these steps. Click on the Advanced Option > Troubleshoot > Advanced Options > Command Prompt. And type: bcdedit /set recoveryenabled NO
Restore the Registry Editor Configuration
Some wrong changes in Registry Editor can stop your OS from operating. However, you can easily restore the previous successful registry boot settings. Click on the Advanced Option > Troubleshoot > Advanced Options > Command Prompt. And follow these steps. Press enter after typing each line of command.
Command 1: C:Command 2: dir (this will list out all the files and folder inside C)Command 3: cd \windows\system32\configCommand 4: MD backupCommand 5: copy . backupCommand 6: cd regbackCommand 7: dir Note: the dir command will list out all the things on your backup. Files on your regback folder must have a certain value besides 0 displayed on the right side. If you have 0’s then exit the command prompt and continue with the next fix.Command 8: copy . ..Now, the command will ask you if you want to overwrite. Type a and press enter to override.Command 9: exit
You will be sent back to the Choose an Options menu. Restart your computer to check if you fixed the problem.
Reset your Computer
If none of the above solutions works, you can reset your computer to fix the issue. To reset your PC, click on the Advanced Options > Troubleshoot > Reset this PC. Depending on whether you wish to keep your data files, click either Keep my files or Remove everything.


title: “Fix Startup Repair Couldn T Repair Your Pc” ShowToc: true date: “2022-11-19” author: “Stacy Hosmer”
However, there are a few other reasons causing the startup error. So, let’s check the common causes, along with a few solutions to this issue discussed below.
Fixes For “Startup Repair couldn’t repair your PC”
Before you get this error, the blue screen windows will say “Automatic Repair: You PC did not start correctly”. First, try to restart your computer. A simple restart can solve the issue. After the restart, if the OS doesn’t fix the issue, you will get a different screen. The windows will display the Startup repair error. The restart option will not be available now. Here are a few Advanced Options settings you can try to fix this issue.
Startup Repair Tool
The Startup Repair Tool will diagnose your PC for any disks error and try to fix them. This usually takes a lot of time depending on the computer you use. To use the Startup Repair Tool, click on the Advanced Option > Troubleshoot > Startup Repair. If the computer has multiple user accounts, there will be an option to choose which user account you want to fix. If the computer still displays the same error, continue with other fixes.
Use the Safe Mode
In safe mode, most of your device and driver won’t be running except for some basic drivers like display drivers, and mouse drivers. These device functions are disabled so that we know the basic drivers are performing properly. To start your computer in safe mode, you can follow these steps.
Click on Troubleshooter on Advanced Options.Select Advanced Option, then Startup Settings.Click on Restart.When your computer restarts, you will see multiple options for safe mode. Press F5 to start safe mode with the internet.
Run the System File Checker (SFC)
The SFC is a windows utility tool that you can use to find and fix corrupted files in your windows. To run the system file checker, you can follow these steps:
Press the Windows + R key.Type cmd and press Shift+Ctrl+Enter to run the command as an administrator.Type sfc /scannow and press the enter key.
Wait for a few minutes for the SFC to complete. Restart your computer to get out of safe mode and check if the startup error is fixed. If you cannot get out of safe mode, you can follow these steps:
Press Ctrl+Shift+Esc to enter task manager.Click on Files, then Run new task.Type “msconfig” and click ok.Click on Boot, Remove the check mark from the safeboot checkbox.
Run the Check Disk Command
The Check Disk command in your computer checks a disk for errors. It shows errors on your disk as a status report. To run check disk, click on the Advanced Option > Troubleshoot > Advanced Options > Command Prompt. Now, type chkdsk c: /r and press enter to repair errors and check of bad sectors.
Fix your Boot Configuration Data
Boot Configuration Data (BCD) is a file that includes boot configuration parameters that tell Windows how to start. A faulty BCD file causes unbootable Windows. To repair your Boot Configuration Data, click on the Advanced Option > Troubleshoot > Advanced Options > Command Prompt.
Type bootrec /rebuildbcd, then press Enter. Wait for the process to completeType bootrec /fixmbr and press EnterAfter completion, type bootrec /fixboot, then press Enter.
Restart your computer to check if the problem is fixed.
Disable Early Launch Anti-Malware Protection
Installing an anti-malware program can cause this issue. You can disable these types of programs by following these steps. To start your computer in safe mode, you can follow these steps.
Click on Troubleshooter on Advanced Menu.Select Advanced Option, then Startup Settings.Click on Restart.When your computer restarts, you will see multiple options from 1 to 9. Press 8 or F8 to select Disable Early Launch Anti-Malware Protection.
Check Memory Module
If your RAM sticks are not performing correctly, you may get the error. The OS constantly needs memory to do its tasks. If you have a faulty memory module, the OS cannot do said task. Here are a few things you can do to fix your memory module.
You can remove the RAM sticks and set them in a different RAM slot.Try turning the computer using a single RAM Stick at a time to determine which one is faulty.Clean the RAM sticks with rubbing alcohol and a cotton swab. And clean the RAM slots with pressurized air.
Disable Automatic Startup Repair
Automatic Startup Repair starts by default if you have some issues when the system boots. If you do not want the Automatic Startup Repair to run, you can simply disable it by following these steps. Click on the Advanced Option > Troubleshoot > Advanced Options > Command Prompt. And type: bcdedit /set recoveryenabled NO
Restore the Registry Editor Configuration
Some wrong changes in Registry Editor can stop your OS from operating. However, you can easily restore the previous successful registry boot settings. Click on the Advanced Option > Troubleshoot > Advanced Options > Command Prompt. And follow these steps. Press enter after typing each line of command.
Command 1: C:Command 2: dir (this will list out all the files and folder inside C)Command 3: cd \windows\system32\configCommand 4: MD backupCommand 5: copy . backupCommand 6: cd regbackCommand 7: dir Note: the dir command will list out all the things on your backup. Files on your regback folder must have a certain value besides 0 displayed on the right side. If you have 0’s then exit the command prompt and continue with the next fix.Command 8: copy . ..Now, the command will ask you if you want to overwrite. Type a and press enter to override.Command 9: exit
You will be sent back to the Choose an Options menu. Restart your computer to check if you fixed the problem.
Reset your Computer
If none of the above solutions works, you can reset your computer to fix the issue. To reset your PC, click on the Advanced Options > Troubleshoot > Reset this PC. Depending on whether you wish to keep your data files, click either Keep my files or Remove everything.
